Have you ever found yourself unable to access your pfSense box via the web interface because of an IP address mismatch on your local network?
Here’s what you need to know to fix it.
The default pfSense® LAN IP address is 192.168.1.1
pfSense® – like all routers – is generally used to connect two or more networks together, such as:
- a wireless to a wired network (a wireless router)
- an internal (local area) network to an external network (e.g. the internet)
- your home network and your work network, via a VPN
And usually, different networks have different addressing schemes, different rules, different costs, different speeds, different access methods and so on.
In order for your desktop PC, tablet, or laptop to operate on your local area network (LAN), it needs to have an IP address, which is assigned to it by the router (in this case, by the pfSense® software).
Because the current internet protocol (IP) addressing scheme, known as IPv4, is running out of addresses, private address ranges were created.
Paradoxically, “private” in this context means that everyone can use them, but only their own version within their own local area network.
The Internet Assigned Numbers Authority (IANA) has reserved the following three blocks of the IP address space for private internets:
10.0.0.0 – 10.255.255.255 (10/8 prefix) = 16,777,216 IP addresses
172.16.0.0 – 172.31.255.255 (172.16/12 prefix) = 1,048,576 IP addresses
192.168.0.0 – 192.168.255.255 (192.168/16 prefix) = 65,536 IP addresses
Source: https://tools.ietf.org/html/rfc1918, Section 3. Private Address Space
pfSense® also needs an IP address to operate within your LAN, and by default, it uses 192.168.1.1, which is the most commonly used IP address in these private address range.
This can cause IP address conflicts
For many applications, this default address works just fine, which is probably why it’s the default address.
However, it’s not at all uncommon for other equipment (e.g. a wireless access point, or an ADSL modem) to use exactly the same address.
In order for your local network to function correctly, every device on it must have a unique address within the network.
This means that if two devices both use the same address (i.e. 192.168.1.1), neither of them will work.
The simple solution is to change one or both of them to use a different address.
But settings in pfSense are generally changed through the web interface using a browser, but if you can’t connect to the pfSense device to access the web interface, you can’t change the IP address to allow you to connect to it.
Aaaarrrrggghhhhh!
You can fix this is via the serial console
One solution is to disconnect both the pfSense device and the client machine from the local network for long enough to change the IP address on the pfSense® box, then reconnect to the network once you’re done.
Unfortunately, if you need any network resources while you do this, they won’t be available and it also usually means physically disconnecting network cables, messing around with network settings in your machine and then having to put it all back afterwards.
Wouldn’t it be nice if there was a way of changing the network settings on the pfSense device without having to care what network it is connected to? Well, there is.
You can use the serial console, and edit the settings directly, independent of the network – tada!
How to edit the pfSense® LAN IP address
1. Connect to the serial console
Well, first you’ll need to connect to the serial console.
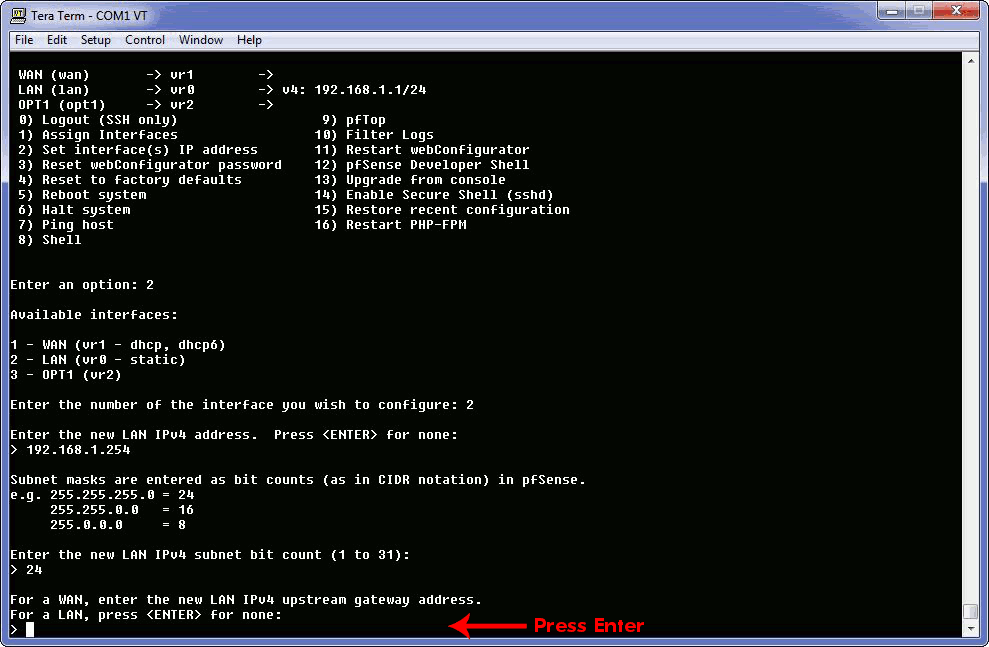
This is what you should see once you’re connected:
2. Edit the assigned network interfaces
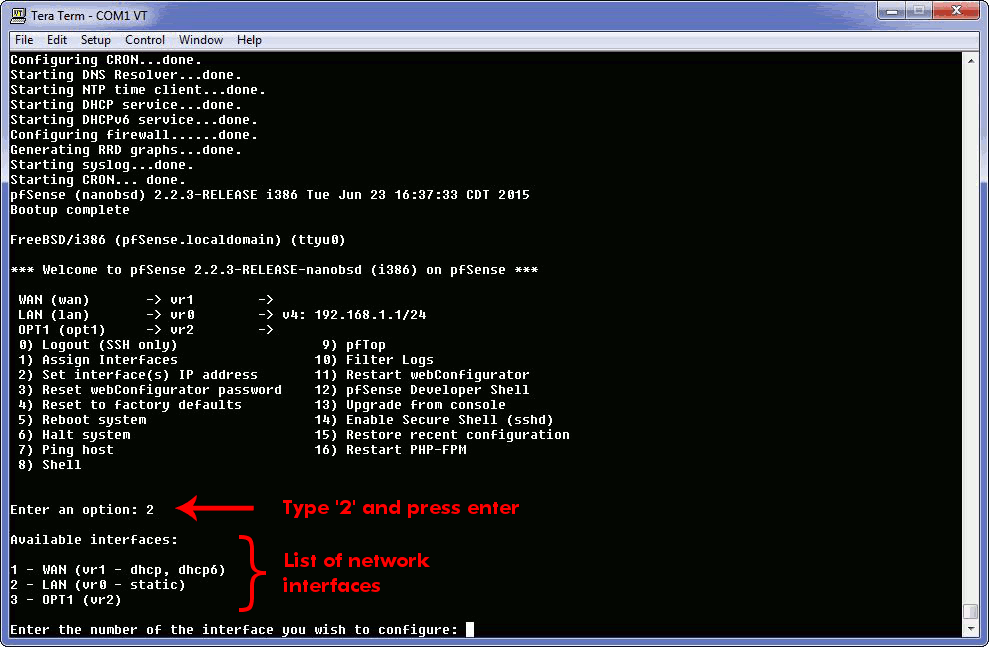
Type ‘2’ and press enter, to access the section of the pfSense® menu where you can edit the IP address of the LAN interface.
You should then see a list of network interfaces, including their current assignments (LAN, WAN , OPT1, etc) and the method used to assign their address (dhcp or static).
Choose the number that corresponds to your LAN interface.
In this instance, the LAN interface is set to ‘2’, so type ‘2’ and press enter.
If your LAN interface is assigned to a different number, type that number instead.
3. Choose a new IP address
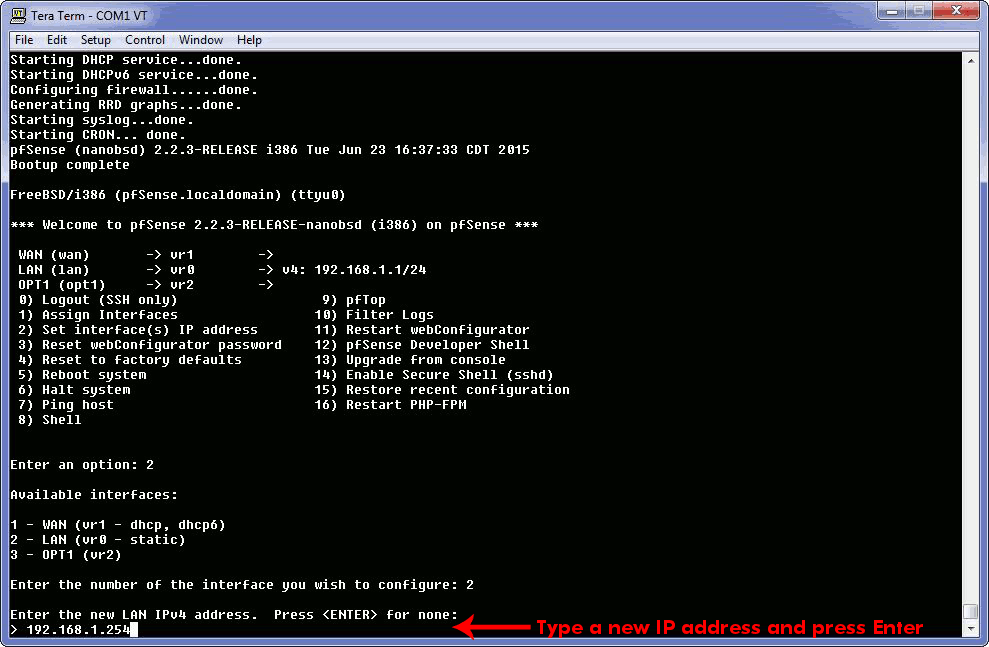
Now you need to enter a new IP address for your pfSense® box.
Let’s say, for the sake of argument, your local network uses addresses between 192.168.1.1 and 192.168.1.255.
All you have to do is pick an address within that range that’s not already in use on your local network.
For this example we’re using 192.168.1.254, but you can choose any IP address you like, provided that it’s:
- Within the range 192.168.1.1 to 192.168.1.255
- Not already in use in your network
4. Choose an appropriate subnet bit count
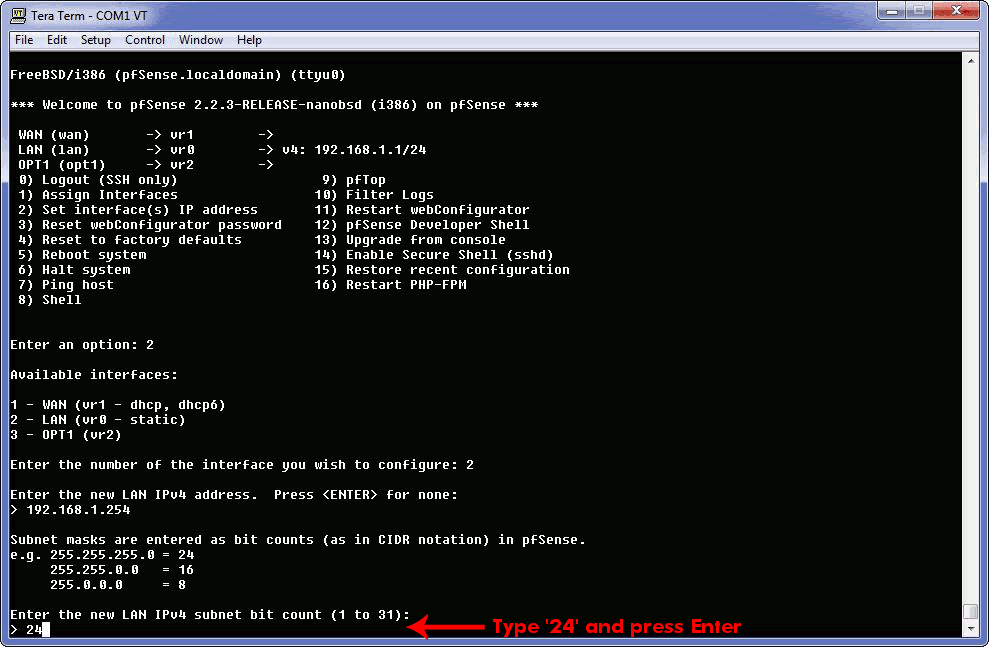
Next, you will be presented with an entirely cryptic question and asked to guess the answer. To make it easier there are some equally cryptic hints presented.
If this question makes as much sense to you as two party preferential voting systems, then just donkey vote and type ’24’.
If you are an aficionado of political systems through the ages (and IP network design), specify any number between 1 and 31 to suit your awe-inspiring mastery of incomprehensible constructs.
(And why exactly are you reading this tutorial anyway?)
5. Confirm the upstream gateway address
When you are asked about upstream gateway addresses, note that it says:
For a LAN, press <ENTER> for none
The fact that you’re editing the LAN interface should make this question totally unnecessary, but you’ll still need press Enter anyway.
Just do it.
6. Ignore IPv6
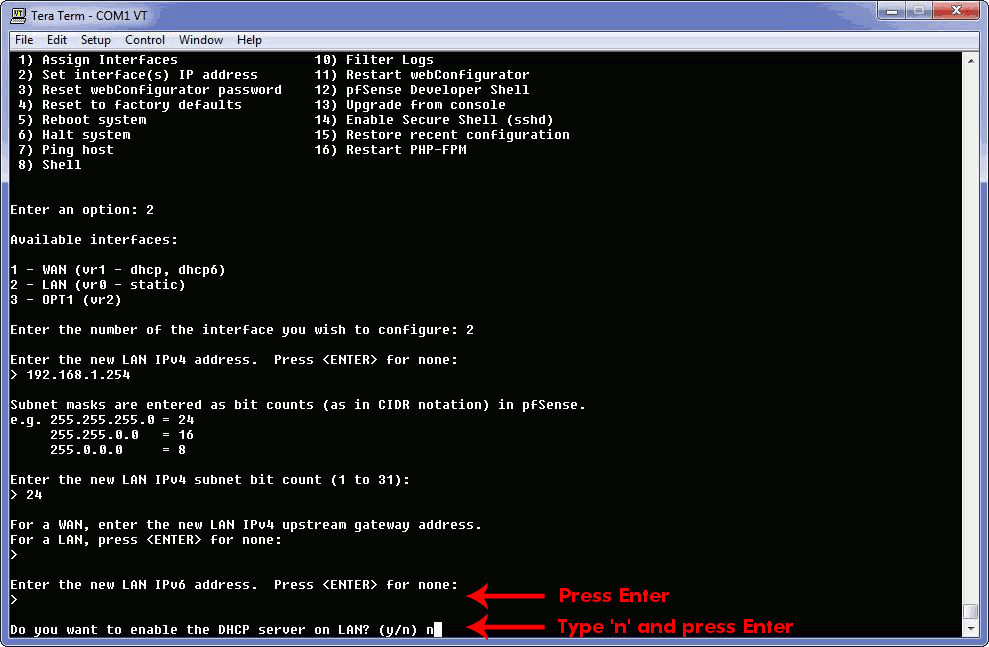
That’s it for IPv4, and now it will ask about IPv6.
It is safe (for now) to ignore IPv6.
Press Enter for none, as indicated.
Almost done.
7. Leave the DHCP server disabled
You’ll now be asked about enabling the DHCP server.
Again, what the hell does that even mean? (Just kidding).
If you don’t know what DHCP is, go with “no” for now.
I generally don’t enable the DHCP server at this stage, unless I’m creating an entirely new network.
It can be readily re-enabled though the web interface later, and right now we’re trying to get you access to the web interface, so fiddling with DHCP server settings here is not necessary, and may actually be harmful.
If you’re adding this device to an existing network, or setting it up to deploy elsewhere, a stray DHCP server issuing new addresses to existing devices can be a real pain.
I say this because when your printers stop working and you finally trace it back to them changing IP address unexpectedly, you’ll decide that selecting “no” this question was a better plan.
Trust me.
8. Decide the protocol for web interface access
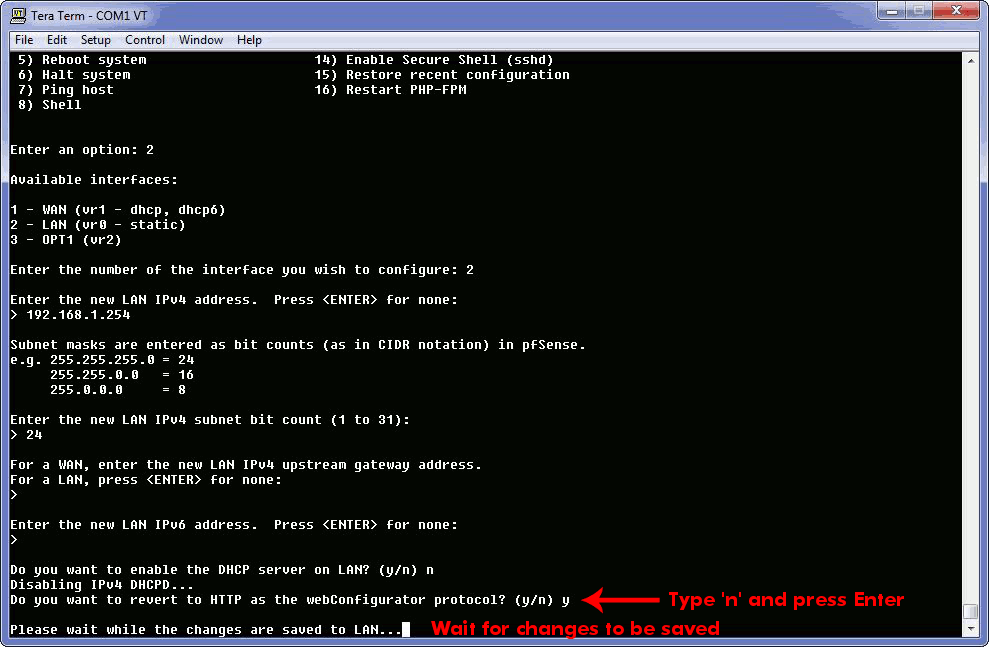
Last, but not least, you’ll need to decide which protocol you want to use to access to the web interface: HTTP, or HTTPS (secure).
If your browser takes issue with self signed certificates (cough, cough, Chrome, ahem…) type ‘y’ (to use HTTP) and press Enter.
If you are concerned that someone or something on your internal network can’t be trusted, type ‘n’ (to use HTTPS) and press Enter.
9. Wait for changes to be saved
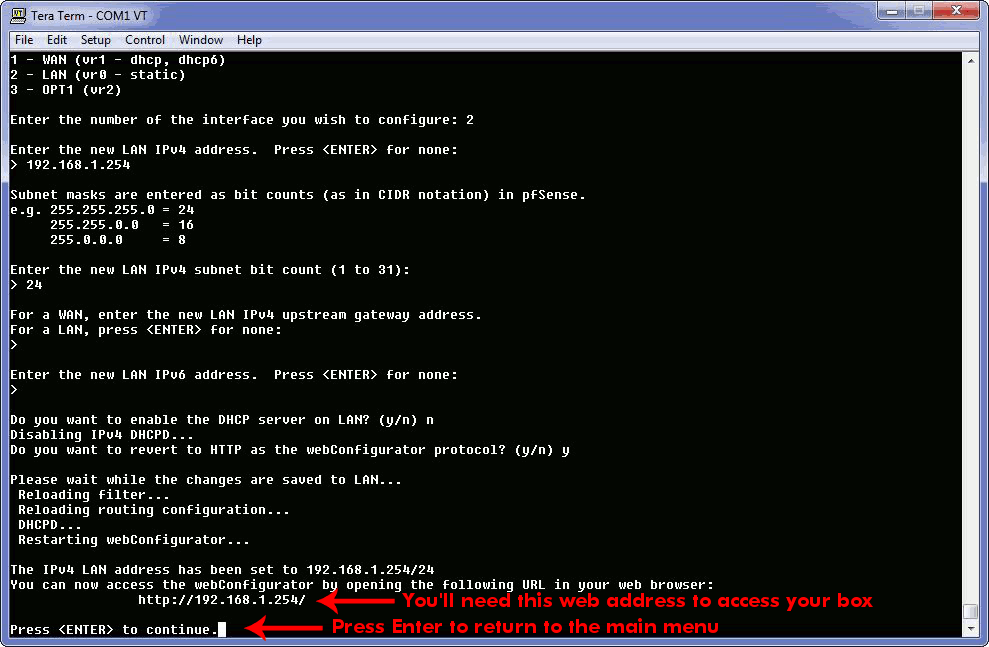
The changes will be saved (takes a moment or two), and you should see a message like this, confirming that it all worked.
Make sure you note the new URL for accessing your pfSense® box in your browser.
When you press Enter to continue, you’ll return to main pfSense® menu (as you saw above in Step 1).
You’re all done!
You should now be able to access your pfSense® box via the web interface.
Just enter the URL from Step 9 (above) into your web browser, and start configuring your new pfSense® router / firewall with ease.
And have a freaking awesome day!
Want to start using pfSense® but not sure where to begin?
Get a head start with pfSense® pre-installed for you on one of our tiny fanless servers.
Want more great articles like this?
Sign up for email updates and get them delivered straight to your inbox.
We'll also donate $5 to Voyage Linux, to support the ongoing development of this fantastic software.
Sign me up!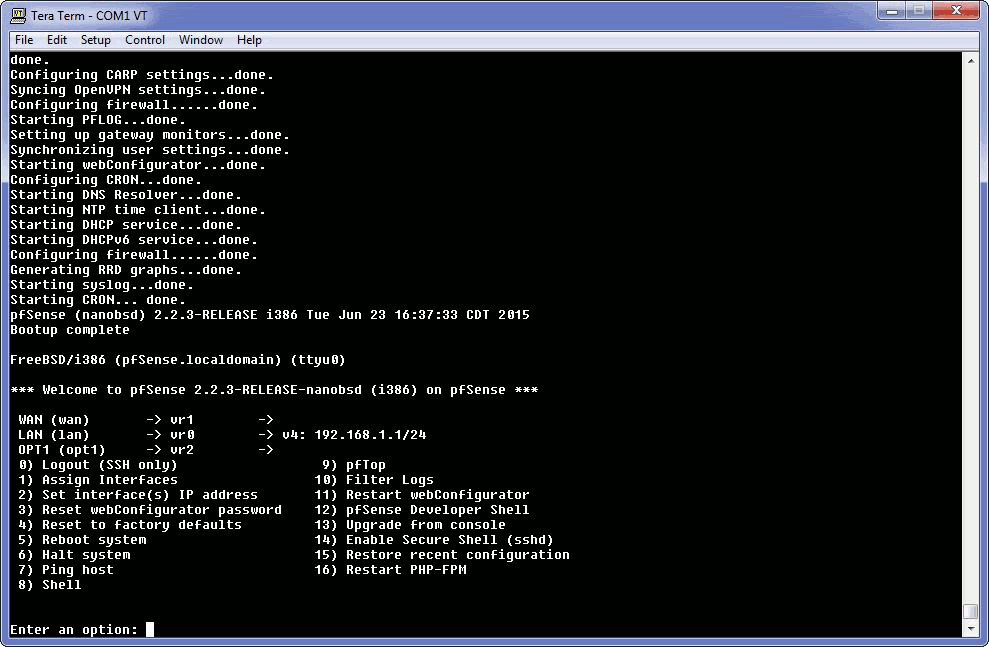



broh…i have done this. But Internet access is not getting up why?
anything to done in pfsense web console ?
give me one solution !
If you have access to the web interface, then you have successfully change the LAN IP address. I don’t know why your internet access isn’t working.
Tried this and 3000 other solutions and none work. Using 2.4.4 on a vbox VM and nothing works.
Side note:
I put everything on an internal network and was able to access the GUI via a 2nd VM on the same client. That was all great until I tried to do things like set up external syslog server, etc. Tried to ping google using the diagnostic tools and of course it can’t ping google.